Pink Minnie Mouse Cupcakes
I love all things Disney and my daughter is already obsessed with Minnie and Mickey Mouse. So for her 3rd birthday, I made these amazing Minnie Mouse cupcakes complete with pink bows.
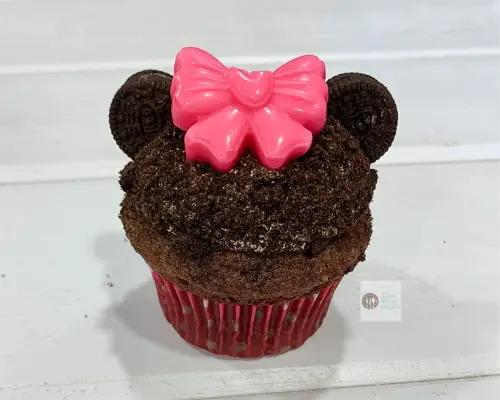
The entire cupcake is edible right down to the bow. I wanted to go beyond just using oreo ears to make the top look like the iconic Minnie Mouse hat we all know and love.
Check out the step-by-step instructions so you can DIY your own for a birthday party or baby shower. (Print the recipe card at the bottom)
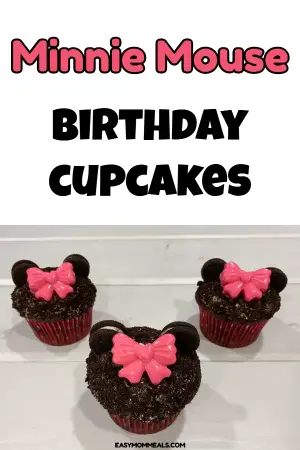
These cupcakes look fancy, and they are a bit time-consuming. But they’re actually easy to do with a little time (and a cooking buddy helps).
Minnie Mouse cupcakes are a common enough idea, but they all them to feature ears, a bow, but then had some color of frosting as the base.
I wanted the top of my cupcake to be completely black, without using black icing which wouldn’t look very appetizing. Oreo dust became the perfect solution for this.
These Minnie Mouse cupcakes are almost too cute to eat and I love that every part of them is completely edible and tastes good too! The guests at our birthday party gobbled them up and I got so many compliments about how cute they were.
Things you’ll need
- Favorite chocolate cake recipe or boxed mix
- Homemade buttercream icing or tub of store bought icing
- Bow mold
- Pink candy melts
- 1 pack of oreos
- 1 bag of mini oreos
How to make Minnie cupcakes with bows
I highly recommend making these over 2 days unless you’re making only a small amount.
1 – Make your cupcakes
The very first thing you need to do is to make your cupcakes. You can use whatever recipe you like. I made mine chocolate but you can really use any flavor.
Some cute pink polka dot cupcake liners add an extra special touch. (Use red if you’re doing red Minnie instead of pink)
Once baked place on a rack to cool. The cupcakes have to be completely cool before you can start decorating them.
2 – Make Minnie Mouse bows
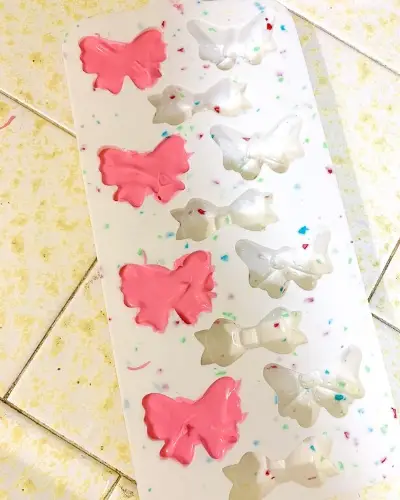
The second part of your prep work is to make all the bows you’ll need. Unless you plan to purchase several candy molds this will take some time. I could do 4 bows at a time in mine.
I purchased my mold at my local Joann’s store but you can buy a candy mold on Amazon as well although the bows may be slightly smaller.
Melt a small amount of candy melts in your microwave. Use a spoon to add the melted candy to your mold right away.
Stick the filled mold in the freezer for 5 minutes until the candy has set. Then, gently push the bow out of the mold.
Store the cupcake bows in an airtight container until you’re ready to use them.
One bag of melts will be plenty. I made 3 dozen cupcakes and still had plenty of melts leftover.
3 – Make your icing
Now you’re ready to start the decorating process!
You’ll need a nice stiff frosting for this project. I used a homemade buttercream recipe but you can use the canned store bought frosting as well if you prefer.
4 – Crush Oreos
Open your container of full sized oreos and remove the white center. It’s okay if a small amount of the oreo cream stays.
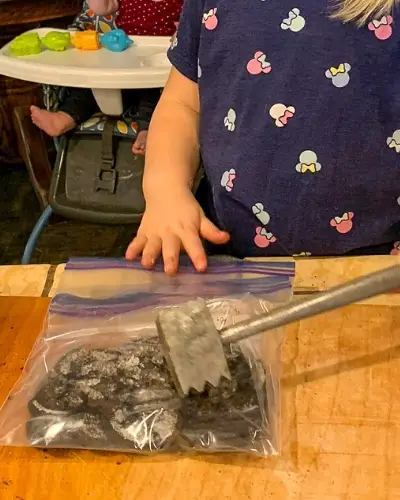
Now, you’ll need to crush those oreos. A food processor is the easiest way. But, if you don’t have one you can simply place the oreo pieces in a ziploc bag and crush them using a meat mallet or rolling pin.
Crushing the oreos is a fun job that’s simple enough that even a toddler can do it.
Once the oreos are finely crushed pour them into a bowl.
5 – Start Decorating!
Now you’re ready to build your cupcakes!
1 – Frost a cupcake (be sure it’s completely cooled first). A decorating tip makes this job easier but you can simply add frosting with a knife as well.
One of the perks of this recipe is that the frosting will be covered up so it doesn’t have to look pretty!
2 – Gently dip the frosted cupcake into the crushed Oreos. You may have to dip it a few times to ensure all areas are coated.
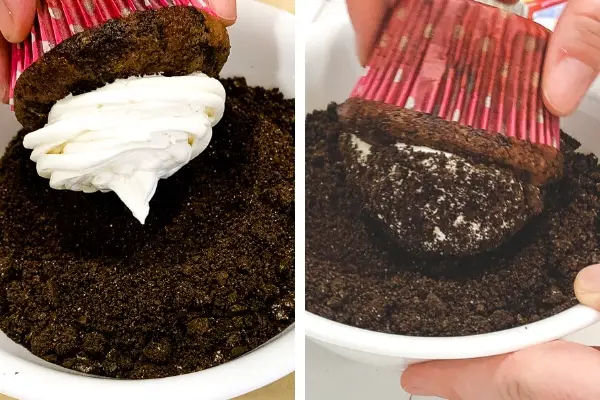
3 – Take two mini oreos and press them into the top of the cupcake, one on either side, to create ears.
4 – Place a small amount of frosting in the center on the back out the hairbows and press them gently onto the cupcake between the ears.
Do one cupcake at a time as you don’t want the frosting to begin to harden or the oreos will not stick.
Tips and Tricks
- Be sure to use completely cooled cupcakes! If you put the frosting on warm cupcakes it will not stick firmly and will slide off when you try to dip it into the crushed Oreos.
- Can you make them ahead of time? You can. However, if the ears spend the night out with air getting to them they will begin to soften. They will still taste good but won’t have that nice crunch.
- Running short of small Oreos? The small Oreos do have a tendency to break apart. You can use just one of the chocolate pieces instead of an entire cookie and it will still look cute.
Have more questions? Feel free to leave a comment below!
Minnie Mouse Cupcakes
Cute & easy Minnie Mouse cupcakes for your next birthday party or baby shower.
Ingredients
- 1 dozen chocolate cupcakes (made from your favorite recipe or store bought mix)
- 1 container of frosting or make your own homemade buttercream
- 1 bag pink candy melts
- 1 box of Oreo cookies
- 1 bag mini oreos
Instructions
- Make 1 dozen cupcakes in your favorite flavor (I like to use chocolate). Allow to cool completely before decorating.
- Melt a small amount of pink candy melts in the microwave. Immediately place into bow candy mold. Place mold in freezer for 5 minutes to set then gently push bows out. Repeat until you have at least 12 bows.
- Remove the center from the large Oreos. Crush with a food processor or place in a Ziploc bag use a meat mallet or rolling pin to break them up. You want them to be pretty fine pieces. Pour crumbs into a cereal bowl or similar.
- Frost the top of one cupcake. Then, gently dip the cupcake into the crushed Oreos. Continue to dip it until all the frosting is coated with Oreos.
- Take two mini Oreos and press into either side of the cupcake to create the ears.
- Place a small dab of frosting on the back of the candy bow in the center and then gently press it into the surface of the cupcake between the ears.
Notes
- Cupcakes must be cool before you add the frosting.
- If possible, make the cupcakes and the bows one day and decorate them another day.
- Frost and decorate cupcakes one at a time. If the frosting begins to harden the Oreos will not stick.
- You can make them ahead of time but the mini Oreo ears will begin to soften as they sit exposed to air.
Recommended Products
As an Amazon Associate and member of other affiliate programs, I earn from qualifying purchases.
 Skip to Content


