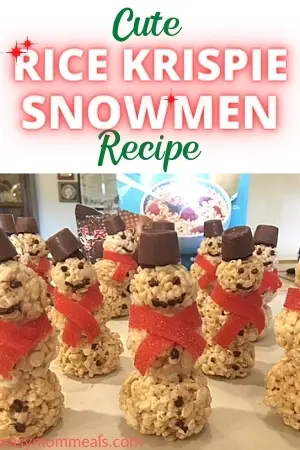
Who doesn’t love a rice krispie treat? These ones are shaped into a snowman to create the perfect wintry treat. These snowmen are so fun to make and pretty easy to make as well.
Make them yourself or use as a fun project for the kids. They are perfect for classroom gifts, workplace gifts, or even a fun alternative for a holiday cookie party!

This post contains affiliate links. If you make a purchase after clicking one of my links I may earn a commission at no additional cost to you.
These cute snowmen are a fun treat to make with kids. You can make them just to eat, to give as gifts, sell at a bake sale, or add to your gingerbread house!
Ingredients
- 1 box of Rice Krispies or similar cereal
- 1 bag of mini marshmallows
- 1 stick of butter
- 1/2 bag of semi-sweet or dark chocolate chips
- 1/2 bag of white chocolate chips
- 1-2 packs of sour strips or fruit roll ups
- 1 bag of rolos
- A few toothpicks
- Parchment paper
Optional:
- 12-15 cellophane bags
- 1 bag of coconut flakes
I was able to make 12 snowmen with these ingredients. Your total may vary depending on how big you make each snowman.
How to Make Rice Krispie Snowmen
Making the Rice Krispie Treat Balls
1 – Before you get started cover 3 baking sheets with parchment paper.
2 – To make the rice krispie treat dough I just followed the recipe on the back of the marshmallow bag.
Mine called for 3 tablespoons of butter and 5 ½ cups of marshmallows. Melt that in a pan on the stove and then mix in 6 cups of rice krispie cereal.
Tip: Measure out your cereal before you start heating the butter and marshmallows. Otherwise, your marshmallow may start to burn while you’re trying to measure cereal.
3 – Once it’s all well mixed and the cereal is coated let it sit for a minute until it’s cool enough to touch with your hands.
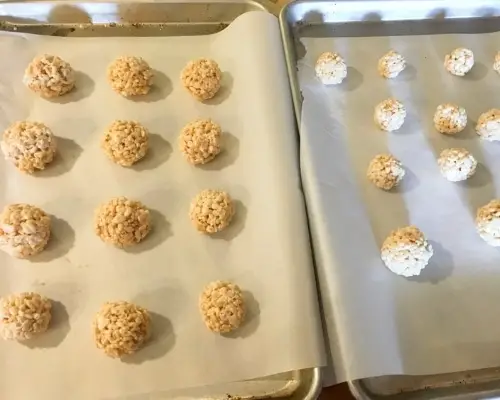
4 – Coat your hands with a little butter so the cereal won’t stick to you and then start rolling the balls for the body of your snowmen.
My largest one was a bit larger than a ping pong ball, maybe the size of one of those Halo fruits. Make some slightly smaller and then some small ones for the heads. (You can also just make two sizes if you prefer shorter snowmen.)
5 – As you finish each ball set it on your parchment paper.
Press down on the balls a bit, especially the larger ones that will be your base. This will flatten it slightly helping to keep your snowmen from tipping and giving you a better surface for when you start connecting your pieces.
6 – Now you’ll need to let these sit for a while so they can cool and start to firm up.

How to build your snowmen
1 – Let them cool completely and firm up a bit before starting to build your snowmen.
2 – Pour about half a bag of white chocolate chips into a microwave-safe bowl and heat for 45-60sec. Remove and give it a good stir. Heat for a few more seconds if necessary.
Don’t overheat it or the chocolate will start to cook and harden. It doesn’t have to be liquidy, just soft.
3 – Pick out a base for your snowman and set it nearby.
Next, pick pieces for the middle and head of the snowman.
Dip the middle piece into the white chocolate and then press it gently onto the base. Use a little bit of pressure but not so much that it squishes your pieces out of shape. Hold for a few seconds so it can set.
4 – Repeat with the head of your snowman.
5 – Repeat until you have used up all of your pieces. I was able to build 12 snowmen.
6 – Let the chocolate firm up. You can even slide the trays into your freezer for a couple minutes if you want.
7 – If you’re planning this as a kids activity I would prep to here before setting the kids loose to decorate their own snowmen, especially for younger kids.

Decorating your snowmen
1 – Pour about half a bag of semi-sweet or dark chocolate chips into a microwave safe bowl and heat until melted as you did above.
2 – Use a toothpick dipped in chocolate to paint on the eyes, buttons, and mouth of your snowman.
You could also use a coffee stirrer or even use a pastry bag to pipe the chocolate on if you want.
If you want to jazz them up you can press mini m&ms into the chocolate for the buttons or eyes.
3 – Let the chocolate firm up before moving forward. I would definitely suggest sticking them in the freezer to speed up the process.
4 – Next, add the scarf. I used some sour roll-ups but you could also use a fruit roll up or anything that comes in bright colors, is a little sticky, and can be cut into strips.
You may have to cut the strips down the middle to make them thin enough for your snowmen. For added cuteness you can cut the end of the strips to look like fringe
5 – Wrap the scarf gently around the neck of the snowmen and press gently to connect the two ends where they cross. The stickiness of the candy should allow for this.
I also pressed the candy gently against the rice krispie treat to help it stay in place.
If you have trouble getting them to stick you can put a little chocolate on the back and hold until it sets a bit.
6 – Last, but not least, is the hat! I tried a couple candies but found that rolos worked best for the size of my snowmen.
It’s best to use the individually wrapped rolos and stick them in the freezer for a bit before you work with them.
7 – Unwrap the bottom of the rolo leaving the foil on the top part. You’ll want to expose enough so that the foil doesn’t get covered in chocolate but you have enough foil to hold onto.
Leaving the candy wrapped helps to prevent the chocolate from melting from your body heat and having fingerprints in all your hats.
8 – Dip the bottom of the rolo into your chocolate you have left from making the faces and buttons and press the hat gently but firmly onto the top of each snowman.
Hold for a few seconds to get a good hold and then gently remove the rest of the foil from the rolo.

Optional: Turn into a cute gift
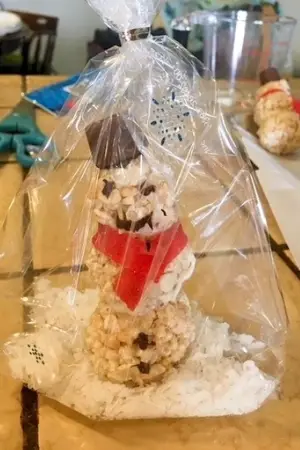
If you want to turn them into a cute gift for a treat exchange or bake sale you can turn your rice krispie snowmen into a cute snowman snowglobe!
1 – Grab a pack of clear cellophane bags and decorate them with some snowflake stickers or buy ones with a snowflake pattern.
2 – Fill the bag with a small amount of coconut flakes which will look like snow.
3 – Gently set your snowman inside and tie it up with the twist tie.
If you want the snowmen to stay more still in their bags you can create a flat bottom in the bag, dip the bottom of the snowman in some warm chocolate and then press it into the bottom of the bag. You’ll want to do this before adding the coconut flakes.
Follow us on Facebook or Instagram for more easy meal ideas and tag us with #easymommeals

 Skip to Content

